Installing the D-Link DSL-G624T - Mac OSX
For information on the D-Link DSL-G624T, please see Getting started with the D-Link DSL-G624T
Before installing the D-Link DSL-G624T wireless router is is imperative that you establish a connection via the Ethernet cable first.
Follow the steps below to connect via Ethernet:
- Connect the Power cable.
- Connect the Blue Ethernet cable to your computer and router.
- Connect the Line cable to the ADSL port and then to the microfilter which should be connected to your telephone socket as well.
- Make sure that the Power, Ethernet and ADSL lights are switched ON and bright green.
Now open your Internet browser and type 192.168.1.1 in the Address bar.
- You'll now be required to enter the Username and Password to access the router Homepage. Please type in "admin" for the default Username and "admin" for the default password.
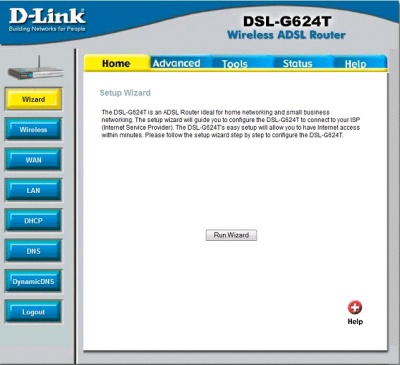
Once the D-Link Homepage has appeared click on Run Wizard.
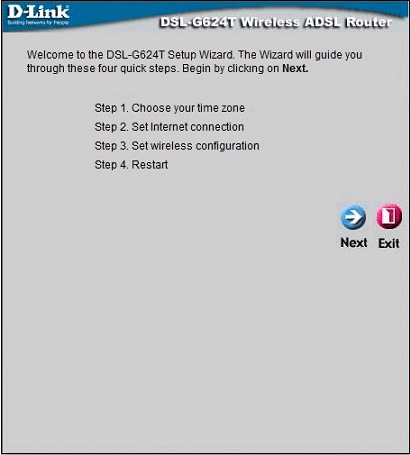
Click Next.
The time zone should be set to (GMT) Greenwich Mean Time. Click Next.

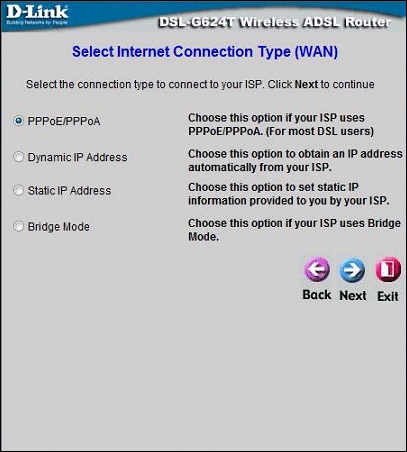
Make sure that PPPoE/PPPoA is selected. Click Next.
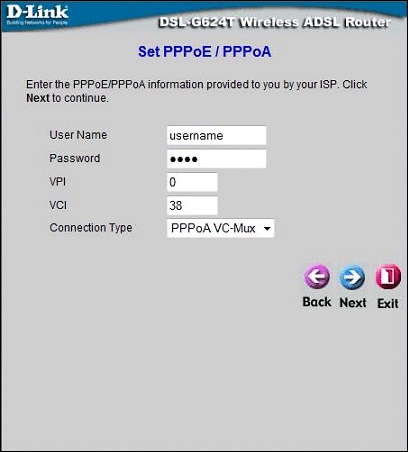
You'll be required to enter some basic information for your connection to work.
- Username is your Madasafish Broadband Username
- Password is your Madasafish Broadband Password
- VPI is 0
- VCI is 38
- Connection type is set to PPPoA VC-Mux
Click Next.
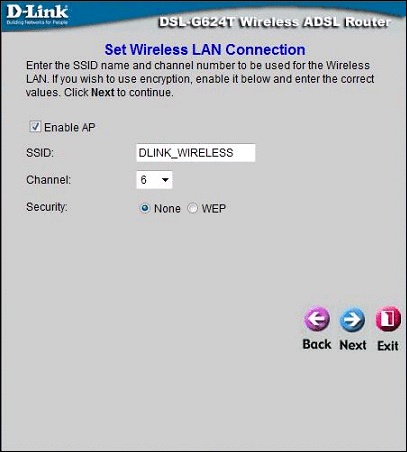
- SSID is set to DLINK_WIRELESS by default.
- Channel is set to 6
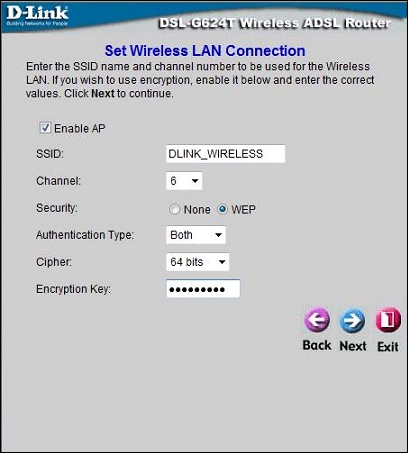
- Security is set to None by default. It's important to have security enabled when connecting wirelessly, please change this from NONE to WEP.
Your WEP Key needs to be in hexadecimal format, this means numbers from 0-9 and letters from A-F only.
Important Note: Please make a note of the WEP Key, you'll be asked to use it when you configure your computer for wireless access. Click on OK.
- If using 64bit then the WEP Key must be 10 characters long
- If using 128bit then the WEP Key must be 26 characters long
Click Next.
Click Restart to save all settings.

Now that the router setup is complete, please ensure that your TCP/IP settings are correct.
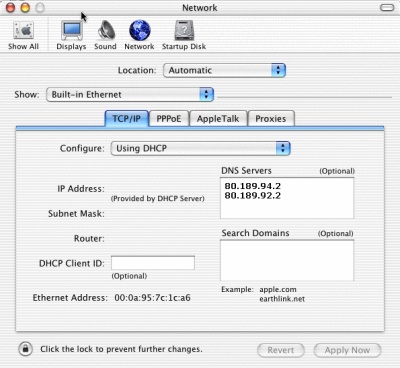
- Click the Apple menu, open System Preferences
- Click on Network.
- Click on the drop down menu Show and select Built-in Ethernet.
- Select the TCP/IP tab and click on the drop down menu Configure.
- Select the option Using DHCP.
- In the DNS Servers box enter the following details, 212.159.13.49 and 212.159.13.50
- Click Apply now and close the window.
Your new router is now set up and ready for use. However to connect wirelessly it's important to install the drivers for the AirPlus G for your connection to work accordingly.
Please see Installing the D-Link AirPlus G to install your wireless adapter.
Has this page helped you solve your problem? Your feedback helps us to improve the help we provide.
Rate this page : 


Please note: We cannot reply to individual feedback through Rate My Page. If you need more help with a problem please use Contact Us.


