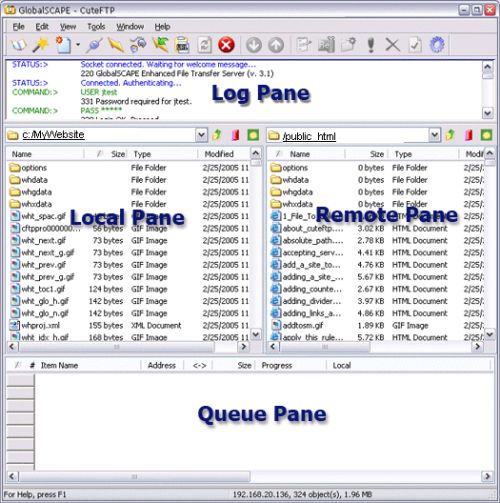
Using CuteFTP
Downloading CuteFTP
- CuteFTP can be downloaded on this page by following the instructions.
- Visit the website http://www.cuteftp.com/download/cuteftp.asp
- Select the English CuteFTP 5.0 XP for Win9x/ME/NT/2000/XP version of CuteFTP, enter your e-mail address in the E-Mail (required) box, select Individual or Business in the User Type box and click the Download Now button.
- After a few moments, the download box will automatically appear. Click on the Save button.
- The Save As window allows you to specify where on your hard drive you save the file, we recommend downloading to a temporary directory.
- Once you have selected the location you wish to save the file to, click on Save and the program will now begin downloading.
- Once it has finished downloading you are ready to install it.
NOTE: CuteFTP is available for all Windows machines (95/98/ME/NT/2000/XP)
Installing CuteFTP
- Click Start, Find, then Files and Folders.
- Within Named enter cuteftp.exe.
- From the drop down menu Look in select the hard disk drive that you downloaded CuteFTP to. Normally C:
- Click Find Now.
- The file, cuteftp.exe, will be displayed within the find window. Double-click this file to run the set up wizard. Then follow the onscreen instructions.
Setting up CuteFTP to allow file transfers.
- Click Start, Programs, GlobalSCAPE then CuteFTP.
- When CuteFTP opens it should display the Site Manager Window. If not, click File and Site Manager.
- Click General FTP Sites, then click New.
- Within Label for site enter Madasafish Webspace.
- Within FTP Host Address enter www.users.madasafish.com.
- Within FTP site User Name enter your username.
- Within FTP site Password enter your password.
- The FTP site connection port should already be set to 21.
- From Login Type select Normal.
- Click on Edit and then Advanced.
- From Transfer Type select Auto-detect.
- Click on the General tab.
- The Host Type should be set to Auto-detect.
- Within Default Local Directory enter the path on your local machine where your HTML files are located.
E.G. C:My_webspaceHTMLfiles
Note: If you are unsure of you local path leave Default Local Directory blank.
Click OK.
Uploading Files
- Within Site Manager click Madasafish Webspace.
- Click Connect.
- To upload files to your webspace, highlight the desired file(s) from your local drive and drag them to the required destination directory on the remote drive.
Note: The local drive is your hard disk drive and is located on the left of the CuteFTP window. The remote drive is the webspace you have been allocated by Madasafish and is located on the right of the CuteFTP window.

Has this page helped you solve your problem? Your feedback helps us to improve the help we provide.
Rate this page : 


Please note: We cannot reply to individual feedback through Rate My Page. If you need more help with a problem please use Contact Us.


