Installing the Voyager 2091 - Wirelessly
You can connect your computer to your Voyager 2091 using either Ethernet, USB or the Wireless connection.
If using the USB connection, you will need to install the Voyager 2091 USB drivers on your computer from the installation CD. If you are only connecting one computer to your Voyager 2091 and the computer meets the minimum specification for both USB and Ethernet, we recommend that you use the Ethernet connection.
Please note that Ethernet, USB and the Wireless connection may be used simultaneously to share your Internet connection, and whichever connection method you choose now, you can always change the connection method and add a connection to the other socket in the future.
Install your wireless adapter on your computer, by following its installation instructions. If your computer has a built-in wireless adapter make sure the adapter is turned on by following the instructions that came with your computer.
Follow the steps below to connect to your wireless network.
- Click Start, then Settings, Control Panel
- Double click the Network Connections icon
- Right click on the Wireless Network Connection
- Click on View Available Wireless Networks
Select the BT Voyager 2091-xx and click on Connect, where xx are the last two digits of the BSSID value printed on the label underneath the base of the router.
Your Voyager 2091 is preset with 128-bit WEP wireless security and uses a 13-character key known as a Wireless Network Key. Only computers that know this key can connect to your BT Voyager 2091 router. Your Wireless Network Key can be found on the pink label on the base of your router.
Enter the 128-bit WEP 13-character and click on OK.
Your Voyager 2091 router should now be connected to your computer, however to establish your broadband connection you will need to do the following:
Open your web browser and type http://192.168.1.1 into the URL address box. Then press the Enter or Return key.
If the computer cannot find the router, leave for a few minutes and try again. Should the dial-up connection appear click on Tools, Internet Options and select the Connections tab, choose Never dial a connection and apply your settings. If this does not solve the problem, restart the computer with the router plugged in and try again.
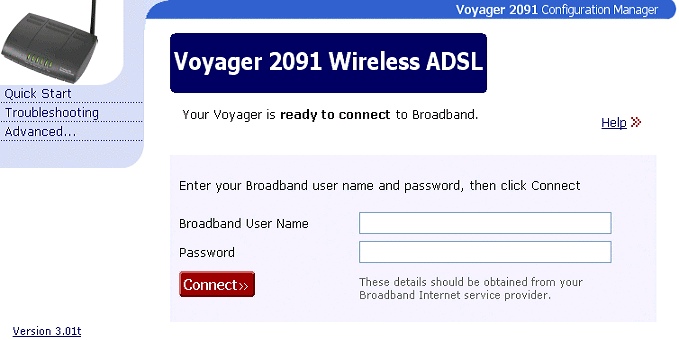
The Configuration Manager opens at the Quick Start page.
Make sure that your Broadband service is ready by checking that the DSL light is ON and steady.
Enter your Broadband User Name and Password into the fields provided on the Quick Start screen.
Click Connect. The Voyager 2091 will now connect you to our Internet service and the Quick Start screen will change to show the connection status. If at any time you wish to disconnect from your Internet service, simply click the Disconnect button.
If you cannot browse the Internet, click Disconnect, then follow steps above again.
With your Voyager 2091 Router, your broadband connection is always-on and you do not have to dial-up to initiate the connection. Simply start your Internet browser and surf the Internet. That's it!
Has this page helped you solve your problem? Your feedback helps us to improve the help we provide.
Rate this page : 


Please note: We cannot reply to individual feedback through Rate My Page. If you need more help with a problem please use Contact Us.


